If you’ve been curious about making a Basque Burnt Cheesecake at home, I’m here to tell you it’s so much easier than it looks. I make this at least once a month — it’s one of those rare desserts that actually wants to be imperfect. No water bath, no cracked-top anxiety, no fussy crust. Just a rich, custardy interior hiding under a beautifully dark, caramelized top that you’ll be genuinely proud of. The whole thing comes together with just six ingredients you probably already have, and it bakes in 30 minutes flat. Whether you’re hosting a dinner party or just treating yourself on a Tuesday, this is the kind of dessert that looks far more impressive than the effort it requires. Trust me — once you make it, you’ll wonder why you ever stressed about cheesecake.
Why This Easy Basque Burnt Cheesecake Works Every Time
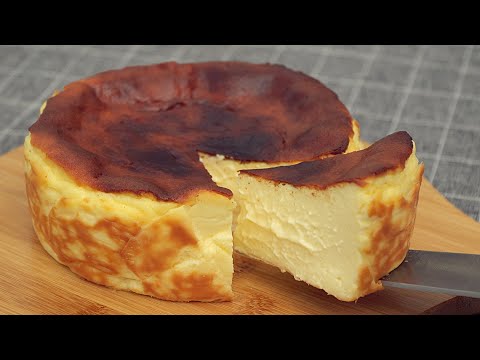
Most cheesecakes are high-maintenance. They need a water bath, a perfect bake, and a slow cool to avoid cracking. The Basque version throws all of that out the window. You bake it hot and fast at 220°C, which deliberately scorches the top while leaving the center soft and almost pudding-like. That contrast — the slightly bitter caramelized crust against the sweet, creamy interior — is exactly what makes this cheesecake so special. It’s a small batch recipe too, baked in a 14cm mold, which means it’s perfectly sized for four people without mountains of leftovers.
The Key Ingredients for a Creamy Basque Cheesecake
Cream cheese: This is the star, so don’t skimp on quality. Use a full-fat block-style cream cheese, not the spreadable kind that comes in a tub. Spreadable versions have added stabilizers and more water content, which can affect the texture. Let it sit at room temperature for at least 30 minutes before you start — cold cream cheese is harder to smooth out and can leave lumps in your batter.
Whipping cream: You want heavy whipping cream here, ideally with a fat content of 35% or higher. This is what gives the cheesecake that luxuriously custardy center. Don’t substitute with half-and-half or light cream — you’ll lose that signature richness.
Cake flour: Only 5g goes in, but it matters. Cake flour has a lower protein content than all-purpose flour, which keeps the texture silky and tender rather than dense. It acts as a very gentle stabilizer without making the cheesecake feel cakey at all.
How to Make Basque Burnt Cheesecake Step by Step
Start by preheating your oven to 220°C. You want it fully up to temperature before the cheesecake goes in, so don’t rush this step.
Step 1: Soften the cream cheese. Add your 250g of room-temperature cream cheese to a mixing bowl and use a spatula to work it against the sides of the bowl until it’s completely smooth and lump-free. This takes a minute or two of patient pressing and folding. You’re looking for a texture like thick frosting — no visible chunks.
Step 2: Add the sugar. Pour in 60g of granulated sugar and continue mixing with the spatula until it’s fully incorporated. The mixture should look glossy and uniform. Give it a taste — it’ll be pleasantly sweet but not overwhelming.
Step 3: Sift in the cake flour. Sifting is important here. It prevents any tiny flour clumps from sneaking into your batter. Switch to a whisk and stir until the flour completely disappears into the mixture.
Step 4: Add the eggs. First, whisk in your egg yolk until it’s fully combined, then add the whole egg and whisk again. The batter will loosen up a little and take on a pale yellow color. It should smell faintly sweet and eggy at this point — that’s exactly right.
Step 5: Pour in the cream. Add 150g of whipping cream and whisk until everything is smooth and pourable. The finished batter should be silky, slightly thick, and flow easily off the whisk in a steady stream.
Step 6: Prepare your mold. Line a 14cm cake mold with parchment paper, letting it scrunch up and extend well above the rim. Don’t worry about making it look neat — the rustic, crinkled paper is part of the look. Pour the batter in and tap the mold firmly on the counter a few times to pop any air bubbles.
Step 7: Bake. Slide it into your preheated oven and bake for 30 minutes. Around the 20-minute mark, you’ll start to smell that deep, nutty caramel aroma filling your kitchen — that’s the top doing its thing. When it’s done, the top should be a deep mahogany brown (it looks almost burnt, which is the whole point) and the center should still have a noticeable jiggle when you gently shake the pan. It won’t look fully set, and that’s perfect.
Step 8: Cool completely. This is the hardest part. Let the cheesecake cool fully in the mold before you try to unmold or slice it. As it cools, the center will firm up from custardy-liquid to a soft, creamy set. Lift it out by the parchment paper, transfer to a serving board, and slice into wedges.
Tips, Swaps, and Variations Worth Knowing
What if I don’t have cake flour? You can substitute with all-purpose flour in the same amount — just 5g. The texture will be very slightly less delicate, but honestly most people won’t notice in a cheesecake this small.
What if my top isn’t browning enough? Every oven runs a little differently. If your top looks pale at the 25-minute mark, switch on the broiler for the last 2-3 minutes and watch it closely. It can go from golden to too dark very quickly.
Can I make it richer? The recipe is already pretty indulgent, but if you want a slightly more pronounced caramel flavor, you can swap granulated sugar for caster sugar — it dissolves a touch more smoothly.
Can I double the recipe? Yes — double all ingredients and use a 20-22cm pan. You may need to add 5-10 minutes to the bake time. Keep an eye on the jiggle test rather than the clock.
Storage and Make-Ahead Notes
Once fully cooled, cover the cheesecake loosely and refrigerate for up to 3 days. Straight from the fridge, it’ll be firm and sliceable with a dense, creamy texture — which many people actually prefer. If you like it softer and more custardy, let it sit at room temperature for 20-30 minutes before serving. This cheesecake also makes an excellent make-ahead dessert since the flavor deepens overnight. I don’t recommend freezing it, as the texture can become grainy once thawed.
Frequently Asked Questions
Why does Basque cheesecake have a burnt top?
The dark, caramelized top is intentional and comes from baking at a high temperature — in this case 220°C. The sugars in the cream cheese and batter caramelize rapidly, creating a slightly bitter, complex crust that contrasts beautifully with the sweet, creamy interior. It’s what defines the Basque style.
Is it supposed to be jiggly when it comes out of the oven?
Yes, absolutely. A significant jiggle in the center is the sign of a perfectly baked Basque cheesecake. The residual heat continues to set the center as it cools, giving you that signature soft, custardy texture. If the center is completely firm in the oven, it’s likely overbaked.
Can I serve this warm or does it need to be chilled?
You can serve it at room temperature once it’s cooled, and it’ll have a wonderfully soft, almost molten texture. Chilling it overnight firms it up considerably and makes it easier to slice cleanly. Both ways are great — it just depends on the texture you prefer.
My cheesecake cracked on top — did I do something wrong?
Not at all. Cracks on a Basque cheesecake are completely normal and part of its rustic charm — unlike traditional cheesecakes, you’re not trying to achieve a smooth surface. The deeply caramelized top naturally develops its own texture, and small cracks or uneven coloring just add to the character of the finished dessert.
Ingredients
Method
- Gather: cream cheeseUnwrap and place 250g of cream cheese into a mixing bowl, then use a spatula to soften it until smooth.▶ Watch this step
Gather: granulated sugar, cream cheeseAdd 60g of granulated sugar to the softened cream cheese and mix well with the spatula until fully incorporated and smooth.▶ Watch this step
Gather: cake flourSift 5g of cake flour into the cream cheese mixture and whisk until no lumps remain and the batter is smooth.▶ Watch this step
Gather: egg yolkSeparate one egg yolk and add it to the mixture, whisking until fully combined.▶ Watch this step
Gather: eggCrack and add one whole egg to the batter, then whisk thoroughly until the egg is completely incorporated and the mixture is uniform.▶ Watch this step
Gather: whipping creamPour 150g of whipping cream into the batter and whisk until the mixture is smooth and has a consistent, pourable texture.▶ Watch this step
Line a 14cm cake mold with parchment paper, ensuring the paper extends above the rim to create a rustic look.▶ Watch this step
Pour the cheesecake batter into the prepared mold and gently tap it on the counter a few times to release any air bubbles.▶ Watch this step
Bake the cheesecake in a preheated oven at 220°C for 30 minutes, or until the top is deeply caramelized and the center is still slightly jiggly.▶ Watch this step
Remove the cheesecake from the oven and allow it to cool completely before serving.▶ Watch this step
Carefully remove the cheesecake from the mold by lifting the parchment paper, then transfer it to a serving board.▶ Watch this step
Leave a Reply
You must be logged in to post a comment.